diffusers版Stable diffusionをWSLのUbuntuで実行する環境をつくる
from Stable diffusionとあそぶ
Stable diffusionをWSL2のUbuntuで実行する環境をつくる
やったあとにきづいたこと
この動かし方はdiffusersをつかっている
直接Stable diffusionのリポジトリを動かしたい場合別セットアップが必要GitHub版のStable diffusionを動かす
環境
Windows 10
Ubuntu 20.04
WSL2
GTX1070→RTX3090
NVidia driver 516.94

古かったのでNvidiaのドライバをアップデートした
事前準備
(やらなくても良い)PowerShellいれる
WSLでCUDAの実行環境を整える
NvidiaのWindowsのGPUドライバはWSL 2をサポートしている
Ubuntu側の設定
>Linux 用の NVIDIA ドライバをインストールしてはいけません
https://docs.nvidia.com/cuda/wsl-user-guide/index.html#cuda-support-for-wsl2 に従ってWSLにCUDA Toolkitを入れる
CudaアプリのコンパイルのためにはCUDA Toolkit for Linux x86が必要
デフォルトのToolkitはドライバが同梱されてしまうので、以下の手順でやればいい(と上の手順に書いてある)
が、この手順は以下の点であまりよくないのでおすすめしない
バージョンがやや古い
インストーラーは11.7.0になっている(11.7.1が最新)
sudo dpkg -i cuda-repo-wsl-ubuntu-11-7-local_11.7.0-1_amd64.deb をしたときに出るとおりに公開鍵をインストールしないとうまくいかない sudo cp /var/cuda-repo-wsl-ubuntu-11-7-local/cuda-B81839D3-keyring.gpg /usr/share/keyrings/ をやりわすれるとこうなるzsh$ sudo apt-get -y install cuda
Reading package lists... Done
Building dependency tree
Reading state information... Done
W: GPG error: file:/var/cuda-repo-wsl-ubuntu-11-7-local InRelease: The following signatures couldn't be verified because the public key is not available: NO_PUBKEY BCD50790B81839D3
E: The repository 'file:/var/cuda-repo-wsl-ubuntu-11-7-local InRelease' is not signed.
N: Updating from such a repository can't be done securely, and is therefore disabled by default.
N: See apt-secure(8) manpage for repository creation and user configuration details.リンクされているプラットフォームごとに動的に生成されるドキュメントの手順で進めたほうがよいだろう
zshwget https://developer.download.nvidia.com/compute/cuda/repos/wsl-ubuntu/x86_64/cuda-wsl-ubuntu.pin
sudo mv cuda-wsl-ubuntu.pin /etc/apt/preferences.d/cuda-repository-pin-600
wget https://developer.download.nvidia.com/compute/cuda/11.7.1/local_installers/cuda-repo-wsl-ubuntu-11-7-local_11.7.1-1_amd64.deb
sudo dpkg -i cuda-repo-wsl-ubuntu-11-7-local_11.7.1-1_amd64.deb
sudo cp /var/cuda-repo-wsl-ubuntu-11-7-local/cuda-*-keyring.gpg /usr/share/keyrings/
# ↑公式のリファレンスは鍵のインストールもあって親切
sudo apt-get update
sudo apt-get -y install cuda
cudaが動いていることを確認する
どちらかで確認する
1.
torch.cuda.is_available() を確認する2. サンプルビルド
>動作確認の意味で /usr/local/cuda/samples 配下にあるサンプル プログラムをビルド・実行してみるのも良いでしょう。
/usr/local/cuda/samples はないので適当に引っ張ってきて実行してもよい(やってみた)zshgit clone https://github.com/NVIDIA/cuda-samples.git
cd uda-samples/Samples/0_Introduction/asyncAPI
make run
./asyncAPI
[./asyncAPI] - Starting...
GPU Device 0: "Pascal" with compute capability 6.1
CUDA device [NVIDIA GeForce GTX 1070]
time spent executing by the GPU: 11.05
time spent by CPU in CUDA calls: 1.49うごいてそうなら先に進む
stable diffusionを動かす
Hugging Faceのアカウントを作成する
アクセストークンを作成
zshsudo apt-get install python3-venv
python3 -m venv env
source env/bin/activate
# deactivate でもとに戻れる
pip install diffusers==0.2.4 transformers scipy ftfy
VSCodeいれる
zshsudo apt-get install wget ca-certificatesフォーマッタの設定をする
GTX1070はVRAMが10GB以下なのでfloat16で実行する
トークンを環境変数に入れておく
.zshrcexport STABLE_DIFFUSION_TOKEN="/your/huggingface/hub/token"環境変数が有効化するようにshellを再実行
zshexec zsh -lコードを書く
main.pyimport torch
from diffusers import StableDiffusionPipeline
import os
from torch import autocast

# get your token at https://huggingface.co/settings/tokens
pipe = StableDiffusionPipeline.from_pretrained(
    "CompVis/stable-diffusion-v1-4",
    revision="fp16",
    torch_dtype=torch.float16,
    use_auth_token=os.environ["STABLE_DIFFUSION_TOKEN"],
)
pipe.to("cuda")

prompt = "a photograph of an astronaut riding a horse"
# この行は公式のマニュアルと少し違うので注意(公式が不完全)
with autocast("cuda"):
    image = pipe(prompt)["sample"][0]
image.save(f"astronaut_rides_horse.png")
実行
zshpython3 main.py初回実行はモデルのダウンロードがあるので時間がかかる
実行完了すると画像が生成される

GTX1070で51 iterationに35秒。全部実行するのに44秒かかった

RTX3070Tiは9秒らしい
2022/10/03 自分でやってみたところ51 iterationに5秒 8.84it/sだった。所要時間が1/5になった。すごい。(消費電力は2倍ぐらいになった)
32bitだともっと速いのかな?
遭遇したトラブル
float16で実行中にランタイムエラーになる
https://twitter.com/kawai_nae/status/1561854348397002753 のようにwith autocast("cuda")をつけないとだめ
公式のマニュアルが不完全
2022/10/03
Zsh$ python3 main.py
/home/motoso/sd/env/lib/python3.8/site-packages/torch/cuda/__init__.py:146: UserWarning:
NVIDIA GeForce RTX 3090 with CUDA capability sm_86 is not compatible with the current PyTorch installation.
The current PyTorch install supports CUDA capabilities sm_37 sm_50 sm_60 sm_70.
If you want to use the NVIDIA GeForce RTX 3090 GPU with PyTorch, please check the instructions at https://pytorch.org/get-started/locally/
これを入れても同じエラー
CUDAのバージョン
zsh/usr/local/cuda/bin/nvcc --version
nvcc: NVIDIA (R) Cuda compiler driver
Copyright (c) 2005-2022 NVIDIA Corporation
Built on Wed_Jun__8_16:49:14_PDT_2022
Cuda compilation tools, release 11.7, V11.7.99
Build cuda_11.7.r11.7/compiler.31442593_0
一回削除する
zshpip uninstall torch
pip3 install torch torchvision torchaudio --extra-index-url https://download.pytorch.org/whl/cu116
うまくいった
zsh python3 main.py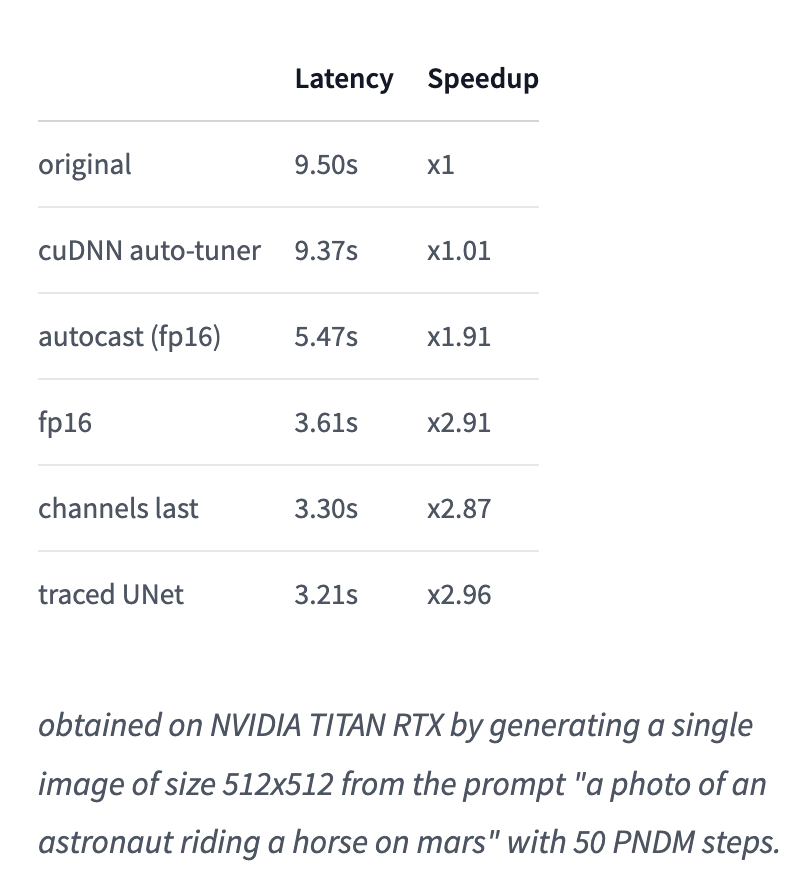
51it [00:05, 8.84it/s]>@Nouamanetazi: Stable Diffusion in the diffusers library became x3 times faster thanks to a set of optimizations tips, some of which require minimal code changes, making it the fastest implementation of Stable Diffusion (afaik)! What are these optimizations?
>A thread 🧵 (1/n)
>
(やらなくていい)鍵がなくて迷走してたときこれをやった
bashapt-key adv --fetch-keys https://developer.download.nvidia.com/compute/cuda/repos/ubuntu2004/x86_64/3bf863cc.pub
apt-key adv --fetch-keys https://developer.download.nvidia.com/compute/machine-learning/repos/ubuntu2004/x86_64/7fa2af80.pub
不要だったので消した
bashsudo apt-key del 7fa2af80
sudo apt-key del 3bf863cc